Spectroscopy Lab
Abstract
Understanding the data we collect from the spectra of a variety of objects provides us the opportunity to draw more conclusions about the given object. For example, the lab hand out explains that we can learn about the chemical make-up, temperature, movement, and size of something by studying its unique spectrum. This lab teaches a basic understanding of the spectra lines.Introduction
In this lab, we use diffraction grating for simple conclusions. We then learn to use a spectrometer to gather more specific data on the emission lines from different substances. The internet is used as a resource to collect information on known elements to help aid in identifying substances in the lab.Procedures
Part I: Observing Spectra using a Diffraction Grating
A. Find a diffraction grating (pictured left) and obtain a spectrometer (pictured below) to use in observing spectra.
A device equipped with a scale for measuring the differences in wavelengths is ideal for comparing the spectra of different objects. Using a scale to compare, rather than comparing the vaguely accurate observation of color seen by our eyes, allows us to get a better idea of the observed materials' compositions later in the experiment.
The spectrometer pictured to below is similar to the one we used.
 B. Using the diffraction grating, look at an incandescent light bulb. Observe the spectrum and record your observation.
C. Learn to use the spectrometer:
1. Find the diffraction grating. Look through this end.
2. Aim the slit on the other end at a light source.
3. Observe the spectrum.
(The corresponding range in units of Angstroms should be between 7000 and 4000. If your scale does not match the one in the spectrometer, talk to your professor about calibrating the device.)
__________
Part II: Observing the Continuous Spectrum of an Incandescent Light Bulb
A. Look at the spectrum of a light bulb with the spectrometer. Observe which colors correspond to which wavelength.
B. Find the edge of the spectrum where the light seems to fade out of view. Record the wavelengths of these two ends.
__________
Part III: Observing the Emission Spectra of Several Elements
C. Observe several spectrum tubes with the spectrometer. Record the wavelengths of light observed and describe what you see. Look at the tubes with your unaided eye and record the color. Use the color and the spectrum combined to identify the gases.
Results and Discussion
Part I: Observing Spectra using a Diffraction Grating
B. The spectrum resulting from the incandescent bulb is continuous. When using the diffraction grating on its own, this is clear. This would explain why the light appears white with the unaided eye: white light is a combination of many or all colors.

Using the scale in the spectrometer, I was able to estimate the bands of light in the emission spectra for each individual gas. Some of the gases not only produced very bright, distinct bands of light, but also faint, dim areas of light as well. Both the bright lines and the faint areas were recorded.
The colors of the bands above can be compared to the wavelengths in the table below to get a good idea of the color observed. Though the elements appeared to be one color when observed without the spectrometer, the colors of light emitted may not be the same, This is because the colors appear different when they are all together, rather than separated out by a prism.

Though the elements appeared to be one color when observed without the spectrometer, the colors of light emitted may not be the same, This is because the colors appear different when they are all together, rather than separated out by a prism. The incandescent bulb, for example, appears to glow white. The spectrum for the bulb, however, shows that the incandescent light actually emits a wide variety of colors.


There were two pieces of information that were most helpful in identifying the gases:
In conclusion, the given lights were most likely composed of hydrogen, neon, krypton, helium, sodium, and nitrogen. These elements were researched online to find their emission lines. Observations from the spectrometer are then compared to the information available online.
C. The spectrometer supplied by Dr. Plavchan for this experiment was already calibrated.
__________
Part II: Observing the Continuous Spectrum of an Incandescent Bulb
A. When using the spectrometer, the colors of light correspond to the wavelength markers on the inside scale. The colors all have specific wavelengths. The range of wavelengths varied greatly, like in the spectrum below:
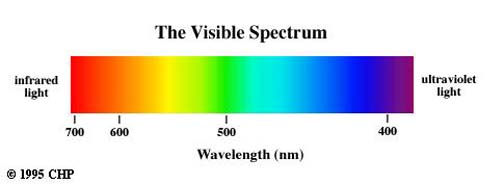
B. The light visible at either end of the spectrum from an incandescent bulb fades out at about 400 nm and 700 nm. This is the threshold for wavelengths I can see with my unaided eye.
__________
Part III: Observing the Emission Spectra of Several Elements
C. 7 tubes were provided, each containing a different gas. Observations are as follows:
Tube #
|
Color
|
Solid Lines (λ in nm)
|
Faint Color (λ in nm)
|
Predicted Element
|
1
|
White
|
--
|
420-700
|
Incandescent bulb
|
2
|
Light purple
|
490
590
660
|
420-620
|
Hydrogen
|
3
|
Bright red
|
500
540
|
625-700
|
Neon
|
4
|
Bright violet/white
|
515
560
590
660
|
440-660
|
Krypton
|
5
|
White
|
445
470
490
500
590
670
710
|
--
|
Helium
|
6
|
Bright yellow
|
470
500
520
570
595
615
|
420-470
|
Sodium
|
7
|
White
|
435
490
545
580
|
410-660
|
Nitrogen
|
1. Solid lines in the spectra
2. Gas color as seen with the unaided eye
The colors of basic elements were researched and the spectra for the elements online were compared to those observed in the classroom. The approximation of the wavelengths of the solid bands of light in the emission spectra were most helpful in identifying the gases because they could be compared with the information provided by outside sources.
No comments:
Post a Comment